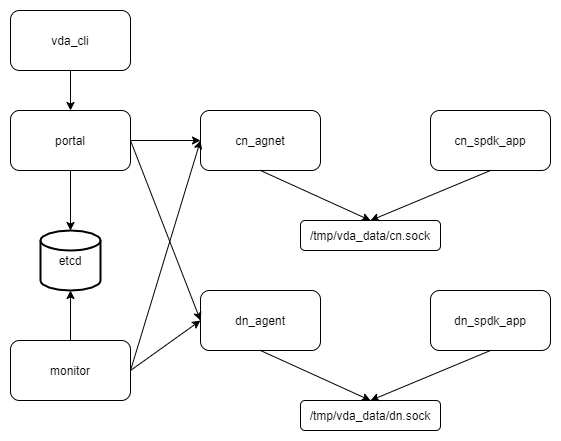
Minimal Deployment
In this guide, we deploy all VDA components to a single server, and explain the basic usage of it. Below are the components we will deploy:
Note
In this guide, we deploy the VDA components to a ubuntu20.04 system. But you could depploy them to any linux x86_86 system.
Create a work directory
Here we create a directory. We will store all the data (e.g. sockets, logs, etcd data) to this directory.
mkdir -p /tmp/vda_data
Install and launch etcd
Follow the official install guide to install etcd. The easy way is to download the pre-built binaries. You can open the latest release page <https://github.com/etcd-io/etcd/releases/latest>, and find the binaries for your OS and arch. In this doc, the latest version is v3.5.0 and we choose the linux-amd64 one:
curl -L -O https://github.com/etcd-io/etcd/releases/download/v3.5.0/etcd-v3.5.0-linux-amd64.tar.gz
tar xvf etcd-v3.5.0-linux-amd64.tar.gz
Go to the etcd directory and launch etcd:
cd etcd-v3.5.0-linux-amd64
./etcd --listen-client-urls http://localhost:2389 \
--advertise-client-urls http://localhost:2389 \
--listen-peer-urls http://localhost:2390 \
--name etcd0 --data-dir /tmp/vda_data/etcd0.data \
> /tmp/vda_data/etcd0.log 2>&1 &
Here we don’t use the default etcd port nubmers. Letter we will let the VDA control plane components (portal and monitor) connect to the etcd 2398 port.
Install spdk
Follow the SPDK Getting Started doc.
git clone https://github.com/spdk/spdk
cd spdk
git submodule update --init
sudo scripts/pkgdep.sh
./configure
make
Initialize the spdk environment (run it once after every reboot):
sudo scripts/setup.sh
Install vda
Go to the vda latest release. Download and unzip the package. In this doc, the latest version is v0.1.0:
curl -L -O https://github.com/virtual-disk-array/vda/releases/download/v0.1.0/vda_linux_amd64_v0.1.0.zip
unzip vda_linux_amd64_v0.1.0.zip
Launch DN components
For each DN, we should run a spdk application and the dn_agent. First, go to the spdk directory and launch the spdk application:
sudo build/bin/spdk_tgt --rpc-socket /tmp/vda_data/dn.sock --wait-for-rpc > /tmp/vda_data/dn.log 2>&1 &
Wait until the /tmp/vda_data/dn.sock is created (1 or 2 seconds
should be enough), then run below commands:
sudo scripts/rpc.py -s /tmp/vda_data/dn.sock bdev_set_options -d
sudo scripts/rpc.py -s /tmp/vda_data/dn.sock nvmf_set_crdt -t1 100 -t2 100 -t3 100
sudo scripts/rpc.py -s /tmp/vda_data/dn.sock framework_start_init
sudo scripts/rpc.py -s /tmp/vda_data/dn.sock framework_wait_init
sudo chmod 777 /tmp/vda_data/dn.sock
We don’t launch the spdk app spdk_tgt directly. We use the
--wait-for-rpc option to let it stay in the init stage. Then
invoke the bdev_set_options to disable the auto examine. It is
required by the VDA. Some bdevs will be exported to CN.
So they shouldn’t be examined by DN. The
nvmf_set_crdt is not requried by DN, it is
required by CN <cn-label>. Here we invoke nvmf_set_crdt to keep
the DN and CN the same.
Then go to the vda binary directory (vda_linux_amd64_v0.1.0) and run below commands:
./vda_dn_agent --network tcp --address '127.0.0.1:9720' \
--sock-path /tmp/vda_data/dn.sock --sock-timeout 10 \
--lis-conf '{"trtype":"tcp","traddr":"127.0.0.1","adrfam":"ipv4","trsvcid":"4420"}' \
--tr-conf '{"trtype":"TCP"}' \
> /tmp/vda_data/dn_agent.log 2>&1 &
The vda_dn_agent listens the controlplane RPC on the --address.
The --lis-conf and --tr-conf are json strings. They are used
for the dataplane connection. The values in --lis-conf will be
passed to the SPDK nvmf_subsystem_add_listener RPC. The values in
tr-conf will be passed to the SPDK nvmf_create_transport
RPC. They are used to configure the NVMeOF connection between VD and cntlr. You can specific any
values the SPDK RPCs accepts.
You can check the /tmp/vda_data/dn_agent.log, if everything is OK, you can find below log:
Launch dn agent server
Launch CN components
For each CN, we should run a spdk applicaiton and the cn-agent. First, go to the spdk directory and launch the spdk application:
sudo build/bin/spdk_tgt --rpc-socket /tmp/vda_data/cn.sock --wait-for-rpc > /tmp/vda_data/cn.log 2>&1 &
Wait until the /tmp/vda_data/cn.sock is created (1 or 2 seconds
should be enough), then run below commands:
sudo scripts/rpc.py -s /tmp/vda_data/cn.sock bdev_set_options -d
sudo scripts/rpc.py -s /tmp/vda_data/cn.sock nvmf_set_crdt -t1 100 -t2 100 -t3 100
sudo scripts/rpc.py -s /tmp/vda_data/cn.sock framework_start_init
sudo scripts/rpc.py -s /tmp/vda_data/cn.sock framework_wait_init
sudo chmod 777 /tmp/vda_data/cn.sock
Similar as DN, we invoke bdev_set_options to disable auto examine,
and we invoke nvmf_set_crdt to provide the delay time. The
nvmf_set_crdt is requried. If we don’t set it, the cntlr
failover may have problem.
Then go to the vda binary directory (vda_linux_amd64_v0.1.0) and run below commands:
./vda_cn_agent --network tcp --address '127.0.0.1:9820' \
--sock-path /tmp/vda_data/cn.sock --sock-timeout 10 \
--lis-conf '{"trtype":"tcp","traddr":"127.0.0.1","adrfam":"ipv4","trsvcid":"4430"}' \
--tr-conf '{"trtype":"TCP"}' \
> /tmp/vda_data/cn_agent.log 2>&1 &
Similiar as DN, the --address is used for the controlplane
RPC. The lis-conf and --tr-conf are json strings for dataplane
connection. They are used by the SPDK nvmf_subsystem_add_listener
and nvmf_create_transport RPCs. They are used to configure the
NVMeOF connection between cntlr and host.
You can check the /tmp/vda_data/cn_agent.log, if everything is OK, you can find below log:
Launch cn agent server
Launch portal
Go to the vda binary directory (vda_linux_amd64_v0.1.0), run below command:
./vda_portal --portal-address '127.0.0.1:9520' --portal-network tcp \
--etcd-endpoints localhost:2389 \
> /tmp/vda_data/portal.log 2>&1 &
We let the portal listen on the tcp 9520 port. The client should send VDA API to this port. The portal is a stateless server, you can put mutiple portals to a load balancer.
You can check the /tmp/vda_data/portal.log, if everything is OK, you can find below log:
Launch portal server
Launch monitor
Go to the vda binary directory (vda_linux_amd64_v0.1.0), run below command:
./vda_monitor --etcd-endpoints localhost:2389 \
> /tmp/vda_data/monitor.log 2>&1 &
By default, the monitor will send heartbeat to each CN and DN for every 5 seconds. You can find such log message in /tmp/vda_data/monitor.log. You can launch multiple monitors, they will use etcd as a coordinator to split their tasks.
Create DN
We have launched the dn_agent, but we don’t store them to the etcd yet. So the VDA cluster doeosn’t know them. We run below command to create a DN in the VDA cluster:
./vda_cli dn create --sock-addr localhost:9720 \
--tr-type tcp --tr-addr 127.0.0.1 --adr-fam ipv4 --tr-svc-id 4420
The --sock-addr should match the --address parameter in the
vda_dn_agent. The portal and monitor
will send RPCs to the sock-addr. The value of --sock-addr is
also used as a unique identifier of the DN. When we want to
modify/delete a DN, or manage a PD in the DN, we
should provide the sock-addr of the DN.
The --tr-type, --tr-addr, --adr-fam and --tr-svc-id
should match the values we provided in the vda_dn_agent. They are
used for the NVMeOF dataplane connections between VD
and cntlr.
Create PD
In this guide, we create a 256M malloc PD for demo:
./vda_cli pd create --sock-addr localhost:9720 --pd-name pd0 \
--bdev-type-key malloc --bdev-type-value 256
The --sock-addr should match the value when we run the dn create
command. The --pd-name can be any string, they should be unique
across the DN. The PDs in different DNs can have the
same name. The --bdev-type-key malloc and --bdev-type-value 256
mean we create a 256M malloc bdev.
Create CN
Similar as DN, we have launched the cn_agent, but the VDA cluster doesn’t know it yet. We run below command to create a CN in the VDA cluster:
./vda_cli cn create --sock-addr localhost:9820 \
--tr-type tcp --tr-addr 127.0.0.1 --adr-fam ipv4 --tr-svc-id 4430
The --sock-addr should match the --address parameter in the
vda_cn_agent. The portal and monitor
will send RPCs to the sock-addr. The value of --sock-addr is
also used as a unique identifier of the CN.
The --tr-type, --tr-addr, --adr-fam and --tr-svc-id
should match the values we provided in teh vda_cn_agent. They are
use for the NVMeOF dataplane connections between cntlr
and host.
Create DA
We have create a DN, a CN and a PD in the DN. Now we can create a DA. The DA will allocate a VD from the PD <pd-label>, and allocate a cntlr from the CN:
./vda_cli da create --da-name da0 --size-mb 64 --physical-size-mb 64 \
--cntlr-cnt 1 --strip-cnt 1 --strip-size-kb 64
- --da-name
A unique name of the DA.
- --size-mb
The size in MegaByte of the DA
- --physical-size-mb
The sum of disk size allocated from all DNs. Currently please alwasy set it to the same value as “–size-mb”. In the further, the VDA would support snapshot, the “--physical-size-mb” and “--size-mb” would be different at that time.
- --cntlr-cnt
How many cntlr the DA will have. We only created a single CN, so we can only allocate one cntlr.
- --strip-cnt
The raid0 strip count. If we set it to a value larger than 1, the VDA cluster will allocate VD from multiple DN. In our demo, we only have a single DN, so we can only set it to 1.
- --strip-size-kb
The strip size of raid0
If everything is OK, we would get below response:
{
  "reply_info": {
    "req_id": "9cb5476a-04c6-4889-9348-a66a3f262602",
    "reply_msg": "succeed"
  }
}
Please note: the "reply_msg": "succeed" means the DA information
has been stored to the etcd cluster. It doesn’t mean the DA has been
created successfully. To verify whether the DA has any problem, you
should use the da get command to get the DA status.
Get DA status
Run below command to get the DA status:
./vda_cli da get --da-name da0
If everything is OK, we would get below response:
{
  "reply_info": {
    "req_id": "03d6b8c3-bdb8-48a5-826e-fd7a63f524a6",
    "reply_msg": "succeed"
  },
  "disk_array": {
    "da_id": "69b60fb6d26e4618898e9a5bfc3941a7",
    "da_name": "da0",
    "da_conf": {
      "qos": {},
      "strip_cnt": 1,
      "strip_size_kb": 64
    },
    "cntlr_list": [
      {
        "cntlr_id": "f18e8e72a6c0451b93dcf2cf73836c91",
        "sock_addr": "localhost:9820",
        "is_primary": true,
        "err_info": {
          "timestamp": "2021-06-21 03:35:13.330887351 +0000 UTC"
        }
      }
    ],
    "grp_list": [
      {
        "grp_id": "b1d4adb7af74463b949edf664ea6aee8",
        "size": 67108864,
        "err_info": {
          "timestamp": "2021-06-21 03:35:12.858939088 +0000 UTC"
        },
        "vd_list": [
          {
            "vd_id": "2b37602b47e84e61bddd06133ca3c192",
            "sock_addr": "localhost:9720",
            "pd_name": "pd0",
            "size": 67108864,
            "qos": {},
            "be_err_info": {
              "timestamp": "2021-06-21 03:35:11.15086787 +0000 UTC"
            },
            "fe_err_info": {
              "timestamp": "2021-06-21 03:35:12.786866942 +0000 UTC"
            }
          }
        ]
      }
    ]
  }
}
The cntlr_list represent all the cntlrs the
DA has. The da0 has only 1 cntlr, which is allcoated from the DN
localhost:9820 and it is the primary cntlr. The err_info only
has a timestamp, which means the error code is 0 (because GRPC omit 0
value). So the cntlr has no problem.
The VDs are aggregated to group. You can find all
groups in the grp_list field. Here we only have a single group and
a single vd. The be_err_info indicate the error information on the
DN. The fe_err_info indicate the error information
on the CN. Similary as the the cntlr err_info
field, if we only find a timestamp field in them, it means the
error code is 0 (no error).
Create an EXP
Run below command to create an EXP:
./vda_cli exp create --da-name da0 --exp-name exp0a \
--initiator-nqn nqn.2016-06.io.spdk:host0
- --da-name
The DA name
- --exp-name
The EXP name, it should be uniqu across the DA
- --initiator-nqn
The nqn of the host. The EXP will only allow this nqn connect to it.
If everything is OK, we would get below response:
{
  "reply_info": {
    "req_id": "29964426-f30b-4c1a-b3e3-25813e59c7c2",
    "reply_msg": "succeed"
  }
}
Please note; the "reply_msg": "succeed" measn the EXP information has
been stored to the etcd cluster. It doesn’t mean the EXP has been
created successfully. To verify whether the EXP has any problem, you
should use the exp get command to get the EXP status.
Get EXP status
Run below command to get the EXP status:
./vda_cli exp get --da-name da0 --exp-name exp0a
Below is the result:
{
  "reply_info": {
    "req_id": "688c9ece-d60d-469d-a1df-5eb385da44c8",
    "reply_msg": "succeed"
  },
  "exporter": {
    "exp_id": "7a6c61442550492ea1f38c617e1864b3",
    "exp_name": "exp0a",
    "initiator_nqn": "nqn.2016-06.io.spdk:host0",
    "target_nqn": "nqn.2016-06.io.vda:exp-da0-exp0a",
    "serial_number": "c5e94c313982b7e362dd",
    "model_number": "VDA_CONTROLLER",
    "exp_info_list": [
      {
        "nvmf_listener": {
          "tr_type": "tcp",
          "adr_fam": "ipv4",
          "tr_addr": "127.0.0.1",
          "tr_svc_id": "4430"
        },
        "err_info": {
          "timestamp": "2021-06-21 04:16:33.986866926 +0000 UTC"
        }
      }
    ]
  }
}
In the DA, each cntlr has a EXP
instance. The exp_info_list lists the EXP status in all the
cntlrs. The nvmf_listener provide the NVMeOF information. The
host can use these information to connect to
it. Similar as DA, if you can only see the timestamp field in
err_info, it means the EXP has no problem.
Connect to the DA/EXP
Install the nvme-tcp kernel module:
sudo modprobe nvme-tcp
Install the nvme-cli. E.g. you may run below command in a ubuntu system:
sudo apt install -y nvme-cli
Connect to the DA/EXP (you can get all the requried parameters from
the exp get command):
sudo nvme connect -t tcp -n nqn.2016-06.io.vda:exp-da0-exp0a -a 127.0.0.1 -s 4430 --hostnqn nqn.2016-06.io.spdk:host0
The disk path would be /dev/disk/by-id/nvme-VDA_CONTROLLER_c5e94c313982b7e362dd.
You can use it as a normal disk on the host, e.g.:
sudo parted /dev/disk/by-id/nvme-VDA_CONTROLLER_c5e94c313982b7e362dd print
Clean up all resources
Disconnect from the host:
sudo nvme disconnect -n nqn.2016-06.io.vda:exp-da0-exp0a
Delete the EXP:
./vda_cli exp delete --da-name da0 --exp-name exp0a
Delete the DA:
./vda_cli da delete --da-name da0
Delete the CN:
./vda_cli cn delete --sock-addr localhost:9820
Delete the PD:
./vda_cli pd delete --sock-addr localhost:9720 --pd-name pd0
Delete the DN:
./vda_cli dn delete --sock-addr localhost:9720
Terminate all the processes:
killall vda_portal
killall vda_monitor
killall vda_dn_agent
killall vda_cn_agent
killall etcd
sudo killall reactor_0
Delete the work directory:
rm -rf /tmp/vda_data