Work With Kubernetes
The VDA can be configured as the kubernetes persistent volume via CSI interface. This guide creates a minimal kubernetes cluster via minikube, and creates a minimal vda cluster, then let the kubernetes cluster claim persistent volume(s) from the vda cluster. Below are the components we will deploy:
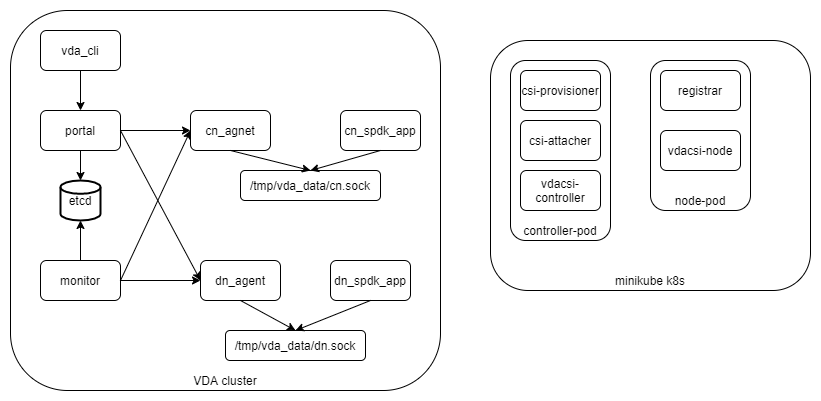
We deploay the kubernetes cluster to a single server, and deploy all the vda components to another server.
kubernetes cluster server ip: 192.168.1.30
vda cluster server ip: 192.168.1.31
Note
In this guide, both the kubernetes clusters server and the vda cluster server are ubuntu20.04 systems. But you could deploy them to any linux x86_64 system.
Deploy VDA
Login to the vda cluster server (192.168.1.31).
The steps are similar as the Minimal Deployment. But there is an important different: In the Minimal Deployment, all the vda components allow local connections (connect from localhost or 127.0.0.1) only. In this guide, the vda cluster should allow two kind of exteranl connections from the kubernetes server:
the NVMeOF to cntlr, for attaching/detaching volume(s)
For simplify the steps, we let all the VDA compoents allow exteranl connections. Login to the vda cluster server (1291.68.1.30), then perform below actions:
Prepare
Create a work directory:
mkdir -p /tmp/vda_data
Install etcd:
curl -L -O https://github.com/etcd-io/etcd/releases/download/v3.5.0/etcd-v3.5.0-linux-amd64.tar.gz
tar xvf etcd-v3.5.0-linux-amd64.tar.gz
Install spdk, follow the SPDK Getting Started doc:
git clone https://github.com/spdk/spdk
cd spdk
git submodule update --init
sudo scripts/pkgdep.sh
./configure
make
Initialize the spdk environment (run it once after every reboot):
sudo HUGEMEM=8192 scripts/setup.sh
Go to the vda latest release. Download and unzip the package. In this doc, the latest version is v0.1.0:
curl -L -O https://github.com/virtual-disk-array/vda/releases/download/v0.1.0/vda_linux_amd64_v0.1.0.zip
unzip vda_linux_amd64_v0.1.0.zip
Launch etcd
Go to the etcd directory and run below commands:
./etcd --listen-client-urls http://192.168.1.30:2389 \
--advertise-client-urls http://192.168.1.30:2389 \
--listen-peer-urls http://localhost:2390 \
--name etcd0 --data-dir /tmp/vda_data/etcd0.data \
> /tmp/vda_data/etcd0.log 2>&1 &
Launch DN
Go to the spdk directory
Run the spdk application:
sudo build/bin/spdk_tgt --rpc-socket /tmp/vda_data/dn.sock --wait-for-rpc > /tmp/vda_data/dn.log 2>&1 &
Wait until the
/tmp/vda_data/dn.sockis created, then run below commands:sudo scripts/rpc.py -s /tmp/vda_data/dn.sock bdev_set_options -d sudo scripts/rpc.py -s /tmp/vda_data/dn.sock nvmf_set_crdt -t1 100 -t2 100 -t3 100 sudo scripts/rpc.py -s /tmp/vda_data/dn.sock framework_start_init sudo scripts/rpc.py -s /tmp/vda_data/dn.sock framework_wait_init sudo chmod 777 /tmp/vda_data/dn.sock
Go to the vda binary directory (vda_linux_amd64_v0.1.0), run below command:
./vda_dn_agent --network tcp --address '192.168.1.30:9720' \
--sock-path /tmp/vda_data/dn.sock --sock-timeout 10 \
--lis-conf '{"trtype":"tcp","traddr":"192.168.1.30","adrfam":"ipv4","trsvcid":"4420"}' \
--tr-conf '{"trtype":"TCP"}' \
> /tmp/vda_data/dn_agent.log 2>&1 &
Launch CN
Go to the spdk directory
Run the spdk application:
sudo build/bin/spdk_tgt --rpc-socket /tmp/vda_data/cn.sock --wait-for-rpc > /tmp/vda_data/cn.log 2>&1 &
Wait until the
/tmp/vda_data/cn.sockis created, then run below commands:sudo scripts/rpc.py -s /tmp/vda_data/cn.sock bdev_set_options -d sudo scripts/rpc.py -s /tmp/vda_data/cn.sock nvmf_set_crdt -t1 100 -t2 100 -t3 100 sudo scripts/rpc.py -s /tmp/vda_data/cn.sock framework_start_init sudo scripts/rpc.py -s /tmp/vda_data/cn.sock framework_wait_init sudo chmod 777 /tmp/vda_data/cn.sock
Go the the vda binary directory (vda_linux_amd64_v0.1.0), run below command:
./vda_cn_agent --network tcp --address '192.168.1.30:9820' \
--sock-path /tmp/vda_data/cn.sock --sock-timeout 10 \
--lis-conf '{"trtype":"tcp","traddr":"192.168.1.30","adrfam":"ipv4","trsvcid":"4430"}' \
--tr-conf '{"trtype":"TCP"}' \
> /tmp/vda_data/cn_agent.log 2>&1 &
Launch portal
Go to the vda binary directory (vda_linux_amd64_v0.1.0), run below command:
./vda_portal --portal-address '192.168.1.30:9520' --portal-network tcp \
 --etcd-endpoints 192.168.1.30:2389 \
 > /tmp/vda_data/portal.log 2>&1 &
Launch monitor
Go to the vda binary directory (vda_linux_amd64_v0.1.0), run below command:
./vda_monitor --etcd-endpoints 192.168.1.30:2389 \
 > /tmp/vda_data/monitor.log 2>&1 &
Create DN, PD and CN
Create DN:
./vda_cli dn create --sock-addr 192.168.1.30:9720 \
--tr-type tcp --tr-addr 192.168.1.30 --adr-fam ipv4 --tr-svc-id 4420 \
--portal-addr 192.168.1.30:9520
Prepare PD backend file
dd if=/dev/zero of=/tmp/vda_data/pd0.img bs=1M count=512
Create PD:
./vda_cli pd create --sock-addr 192.168.1.30:9720 --pd-name pd0 \
--bdev-type-key aio --bdev-type-value /tmp/vda_data/pd0.img \
--portal-addr 192.168.1.30:9520
Create CN:
./vda_cli cn create --sock-addr 192.168.1.30:9820 \
--tr-type tcp --tr-addr 192.168.1.30 --adr-fam ipv4 --tr-svc-id 4430 \
--portal-addr 192.168.1.30:9520
Deploy Kubernetes
Login to the kubernetes cluster server (192.168.1.30).
Install and run minikube
We use minikube to deploy the kubernetes cluster. Please run below commands to install minikube on a linux server:
curl -LO https://storage.googleapis.com/minikube/releases/latest/minikube-linux-amd64
sudo install minikube-linux-amd64 /usr/local/bin/minikube
The minikube supports several drivers.
The default driver docker doesn’t work with the VDA sidecars, so we
use the none driver. To run the none driver, we should still
install docker on the server. Please follow the
docker official doc
to install docker. In this guide, we install the docker to a
ubuntu20.04 system, so we run below commands:
sudo apt-get remove docker docker-engine docker.io containerd runc
sudo apt-get update
sudo apt-get install \
  apt-transport-https \
  ca-certificates \
  curl \
  gnupg \
  lsb-release
curl -fsSL https://download.docker.com/linux/ubuntu/gpg | sudo gpg --dearmor -o /usr/share/keyrings/docker-archive-keyring.gpg
echo \
 "deb [arch=amd64 signed-by=/usr/share/keyrings/docker-archive-keyring.gpg] https://download.docker.com/linux/ubuntu \
$(lsb_release -cs) stable" | sudo tee /etc/apt/sources.list.d/docker.list > /dev/null
sudo apt-get update
sudo apt-get install docker-ce docker-ce-cli containerd.io
By default, only root can run docker. You can follow the docker postinstall guide to run docker under the current user:
sudo groupadd docker
sudo usermod -aG docker $USER
newgrp docker
To to run minikube with none driver, the server should meet
these requirements.
In this guide, we use a ubuntu20.04 system, we should run below
command to install conntrack:
sudo apt install conntrack
Then we can run minikube:
minikube start --driver=none
Then you can run below command to make sure the kubernetes is running:
minikube kubectl -- get pods -A
Wait until all the READY become 1/1:
NAMESPACE     NAME                                      READY   STATUS    RESTARTS   AGE
kube-system   coredns-74ff55c5b-fdv88                   1/1     Running   0          111s
kube-system   etcd-ip-192-168-1-31                      1/1     Running   0          2m6s
kube-system   kube-apiserver-ip-192-168-1-31            1/1     Running   0          2m6s
kube-system   kube-controller-manager-ip-192-168-1-31   1/1     Running   0          2m6s
kube-system   kube-proxy-ddzg4                          1/1     Running   0          111s
kube-system   kube-scheduler-ip-192-168-1-31            1/1     Running   0          2m6s
kube-system   storage-provisioner                       1/1     Running   1          2m5s
Create sidecars
Download the example configuration files:
curl -L -O https://raw.githubusercontent.com/virtual-disk-array/vda/master/scripts/integtest/controller-rbac.yaml
curl -L -O https://raw.githubusercontent.com/virtual-disk-array/vda/master/scripts/integtest/controller.yaml
curl -L -O https://raw.githubusercontent.com/virtual-disk-array/vda/master/scripts/integtest/node-rbac.yaml
curl -L -O https://raw.githubusercontent.com/virtual-disk-array/vda/master/scripts/integtest/node.yaml
curl -L -O https://raw.githubusercontent.com/virtual-disk-array/vda/master/scripts/integtest/storageclass.yaml
These files are used by vda testing code. To use them, we should modify two things
Change the vda-endpoint to 192.168.1.30:9520
Change the imagePullPolicy to IfNotPresent
Please run below commands:
sed -i "s/--vda-endpoint=127.0.0.1:9520/--vda-endpoint=192.168.1.30:9520/" controller.yaml
sed -i "s/Never/IfNotPresent/" controller.yaml
sed -i "s/--vda-endpoint=127.0.0.1:9520/--vda-endpoint=192.168.1.30:9520/" node.yaml
sed -i "s/Never/IfNotPresent/" node.yaml
Then apply them to kubernetes:
minikube kubectl -- apply -f controller-rbac.yaml
minikube kubectl -- apply -f controller.yaml
minikube kubectl -- apply -f node-rbac.yaml
minikube kubectl -- apply -f node.yaml
minikube kubectl -- apply -f storageclass.yaml
Get the status of the controller and node:
minikube kubectl -- get pods
Make sure the READY of controller and node become 3/3 and 2/2:
NAME                  READY   STATUS    RESTARTS   AGE
vdacsi-controller-0   3/3     Running   0          17s
vdacsi-node-rng9x     2/2     Running   0          17s
Operate against the kubernetes
Login to the kubernetes server (192.168.1.30).
Download the sample PVC(PersistentVolumeClaim) and Pod file
curl -L -O https://raw.githubusercontent.com/virtual-disk-array/vda/master/scripts/integtest/testpvc.yaml
curl -L -O https://raw.githubusercontent.com/virtual-disk-array/vda/master/scripts/integtest/testpod.yaml
Apply the PVC file
minikube kubectl -- apply -f testpvc.yaml
Apply the Pod file
minikube kubectl -- apply -f testpod.yaml
Wait for a while, run below command to get the status of the testpod:
minikube kubectl -- get pods vdacsi-test
You would get similar output as below:
NAME          READY   STATUS    RESTARTS   AGE
vdacsi-test   1/1     Running   0          55s
Cleanup
Cleanup the kubernetes cluster
Login to the kubernetes server (192.168.1.30)
Delete test pod and test PVC:
minikube kubectl -- delete pod vdacsi-test
minikube kubectl -- delete pvc vdacsi-pvc
Delete the kubernentes cluster:
minikube stop
minikube delete --all
Cleanup the VDA cluster
Login to the VDA cluster (192.168.1.31)
Kill all the processes:
killall vda_portal
killall vda_monitor
killall vda_dn_agent
killall vda_cn_agent
killall etcd
sudo killall reactor_0
Delete the work directory:
rm -rf /tmp/vda_data