Multiple Components In One Server
The VDA cluster could manager thousands of DN and CN. Generally, each DN or CN should be deployed to a dedicate server. But for testing purpose, we can deploy multiple DNs and CNs to a single server. This guide will show you how to do that and examine how VDA manages multiple DNs and CNs. Below is the components we will deploy:
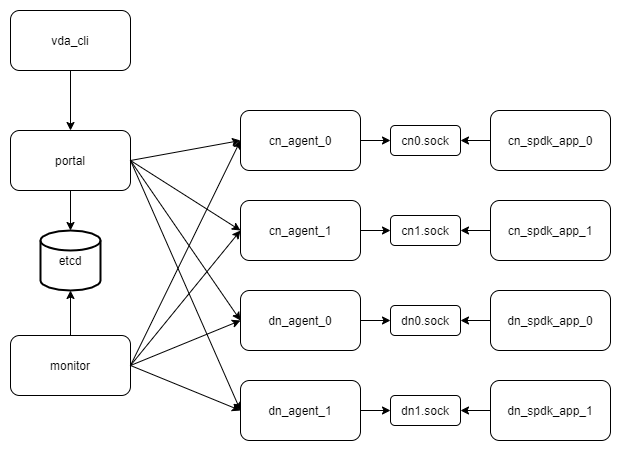
Each cn_agnet and dn_agent should have its own spdk application. We will deploy 2 cn_agent and 2 dn_agent, so we will launch 4 spdk applications. All of their NVMeOF targets should listen on different port. To deploy these spdk applications, the server should have at least 8G hugepages.
Note
In this guide, we deploy the VDA components to a ubuntu20.04 system. But you could depploy them to any linux x86_86 system.
Create a work directory
Here we create a directory. We will store all the data (e.g. sockets, logs, etcd data) to this directory.
mkdir -p /tmp/vda_data
Install and launch etcd
Follow the official install guide to install etcd. The easy way is to download the pre-built binaries. You can open the latest release page <https://github.com/etcd-io/etcd/releases/latest>, and find the binaries for your OS and arch. In this doc, the latest version is v3.5.0 and we choose the linux-amd64 one:
curl -L -O https://github.com/etcd-io/etcd/releases/download/v3.5.0/etcd-v3.5.0-linux-amd64.tar.gz
tar xvf etcd-v3.5.0-linux-amd64.tar.gz
Go Launch etcd:
etcd-v3.5.0-linux-amd64/etcd --listen-client-urls http://localhost:2389 \
--advertise-client-urls http://localhost:2389 \
--listen-peer-urls http://localhost:2390 \
--name etcd0 --data-dir /tmp/vda_data/etcd0.data \
> /tmp/vda_data/etcd0.log 2>&1 &
Here we don’t use the default etcd port nubmers. Letter we will let the VDA control plane components (portal and monitor) connect to the etcd 2398 port.
Install vda
Go to the vda latest release. Download and unzip the package. In this doc, the latest version is v0.2.1:
curl -L -O https://github.com/virtual-disk-array/vda/releases/download/v0.2.1/vda_linux_amd64_v0.2.1.tar.gz
tar xvf vda_linux_amd64_v0.2.1.tar.gz
Go to the vda_linux_amd64_v0.2.1 directory. We will run all the following commands in this directory:
cd vda_linux_amd64_v0.2.1
Prepare SPDK environment
The vda dataplane code is a SPDK application, so we should configure the SPDK environment before we run it. Here we use 8G hugepages because we will launch multiple SPDK applications. The default 2G hugepage is not large enough:
sudo HUGEMEM=8192 ./spdk/scripts/setup.sh
Launch dn0
Launch the dataplane application:
sudo ./vda_dataplane --config ./dataplane_config.json \
--rpc-socket /tmp/vda_data/dn0.sock > /tmp/vda_data/dn0.log 2>&1 &
Change the ower of dn0.sock, so the controlplane agent could communicate with it:
sudo chown $(id -u):$(id -g) /tmp/vda_data/dn0.sock
Launch the controlplane agent:
./vda_dn_agent --network tcp --address '127.0.0.1:9720' \
--sock-path /tmp/vda_data/dn0.sock --sock-timeout 10 \
--lis-conf '{"trtype":"tcp","traddr":"127.0.0.1","adrfam":"ipv4","trsvcid":"4420"}' \
--tr-conf '{"trtype":"TCP"}' \
> /tmp/vda_data/dn_agent_0.log 2>&1 &
We let the dn0 controlplane listen on 127.0.0.1:9720, the dataplane listen on 127.0.0.1:4420.
Launch dn1
Launch the dataplane application:
sudo ./vda_dataplane --config ./dataplane_config.json \
--rpc-socket /tmp/vda_data/dn1.sock > /tmp/vda_data/dn1.log 2>&1 &
Change the owner of dn0.sock, so the controlplane agent could communicate with it:
sudo chown $(id -u):$(id -g) /tmp/vda_data/dn1.sock
Launch the controlplane agent:
./vda_dn_agent --network tcp --address '127.0.0.1:9721' \
--sock-path /tmp/vda_data/dn1.sock --sock-timeout 10 \
--lis-conf '{"trtype":"tcp","traddr":"127.0.0.1","adrfam":"ipv4","trsvcid":"4421"}' \
--tr-conf '{"trtype":"TCP"}' \
> /tmp/vda_data/dn_agent_1.log 2>&1 &
We let the dn1 controlplane listen on 127.0.0.1:9721, the dataplane listen on 127.0.0.1:4421.
Launch cn0
Launch the dataplane application:
sudo ./vda_dataplane --config ./dataplane_config.json \
--rpc-socket /tmp/vda_data/cn0.sock > /tmp/vda_data/cn0.log 2>&1 &
Change the owner of cn0.sock, so the controlplane agent could communicate with it:
sudo chown $(id -u):$(id -g) /tmp/vda_data/cn0.sock
Launch the controlplane agent:
./vda_cn_agent --network tcp --address '127.0.0.1:9820' \
--sock-path /tmp/vda_data/cn0.sock --sock-timeout 10 \
--lis-conf '{"trtype":"tcp","traddr":"127.0.0.1","adrfam":"ipv4","trsvcid":"4430"}' \
--tr-conf '{"trtype":"TCP"}' \
> /tmp/vda_data/cn_agent_0.log 2>&1 &
We let the cn0 controlplane listen on 127.0.0.1:9820, the dataplane listen on 127.0.0.1:4430.
Launch cn1
Launch the dataplane application:
sudo ./vda_dataplane --config ./dataplane_config.json \
--rpc-socket /tmp/vda_data/cn1.sock > /tmp/vda_data/cn1.log 2>&1 &
Change the owne of cn0.sock, so the controlplane agent could communicate with it:
sudo chown $(id -u):$(id -g) /tmp/vda_data/cn1.sock
Launch the controlplane agent:
./vda_cn_agent --network tcp --address '127.0.0.1:9821' \
--sock-path /tmp/vda_data/cn1.sock --sock-timeout 10 \
--lis-conf '{"trtype":"tcp","traddr":"127.0.0.1","adrfam":"ipv4","trsvcid":"4431"}' \
--tr-conf '{"trtype":"TCP"}' \
> /tmp/vda_data/cn_agent_1.log 2>&1 &
We let the cn1 controlplane listen on 127.0.0.1:9821, the dataplane listen on 127.0.0.1:4431.
Launch portal
Run below command:
./vda_portal --portal-address '127.0.0.1:9520' --portal-network tcp \
--etcd-endpoints localhost:2389 \
> /tmp/vda_data/portal.log 2>&1 &
Launch monitor
Run below command:
./vda_monitor --etcd-endpoints localhost:2389 \
> /tmp/vda_data/monitor.log 2>&1 &
Create DNs, PDs and CNs
Create dn0:
./vda_cli dn create --sock-addr localhost:9720 \
--tr-type tcp --tr-addr 127.0.0.1 --adr-fam ipv4 --tr-svc-id 4420 \
--location localhost:9720
Create pd0 on dn0:
dd if=/dev/zero of=/tmp/vda_data/pd0.img bs=1M count=512
./vda_cli pd create --sock-addr localhost:9720 --pd-name pd0 \
--bdev-type-key aio --bdev-type-value /tmp/vda_data/pd0.img
Create dn1:
./vda_cli dn create --sock-addr localhost:9721 \
--tr-type tcp --tr-addr 127.0.0.1 --adr-fam ipv4 --tr-svc-id 4421 \
--location localhost:9721
Create pd1 on dn1:
dd if=/dev/zero of=/tmp/vda_data/pd1.img bs=1M count=512
./vda_cli pd create --sock-addr localhost:9721 --pd-name pd1 \
--bdev-type-key aio --bdev-type-value /tmp/vda_data/pd1.img
When we create dn0 and dn1, we use the --location option. The
location is a string. When the VDA allocate VDs
across multiple DNs, it will make sure no two DNs
has the same location. It will make sure the the DA
is constructed by multiple DNs. If we omit the --location, it
means this DN can go together with any other DN.
In previous tutorial, we use malloc bdev as pd. Here we use aio bdev
as pd0 and pd1. The aio bdev is also used as test purpose. You could
create a file as the backend of the aio bdev. The file size will be
the aio bdev size. So the aio bdev could be used to emulate larger
bdev than malloc bdev. The pd1 could have the same pd-name as pd0,
here we use different name for avoid confusing.
Create cn0:
./vda_cli cn create --sock-addr localhost:9820 \
--tr-type tcp --tr-addr 127.0.0.1 --adr-fam ipv4 --tr-svc-id 4430 \
--location localhost:9820
Create cn1:
./vda_cli cn create --sock-addr localhost:9821 \
--tr-type tcp --tr-addr 127.0.0.1 --adr-fam ipv4 --tr-svc-id 4431 \
--location localhost:9821
Similar as dn0 and da1, we use the --location to make sure we
won’t allocate two cntlrs from the same CN.
Create da0
create da0:
./vda_cli da create --da-name da0 --size-mb 128 --physical-size-mb 128 \
--cntlr-cnt 2 --strip-cnt 2 --strip-size-kb 64
We have two CNs, so we can set --cntlr-cnt 2,
let the da0 have two cntlrs. We have two
DNs, so we can set --strip-cnt 2, let the dn0
have two strips.
Get the da0 status
Run below command to get the DA status:
./vda_cli da get --da-name da0
Below is an example response:
{
  "reply_info": {
    "req_id": "fded5447-b92e-4642-b21f-448c5977f2b1",
    "reply_msg": "succeed"
  },
  "disk_array": {
    "da_id": "81427a2f66f64c228bd0d8ef25817a50",
    "da_name": "da0",
    "da_conf": {
      "qos": {},
      "strip_cnt": 2,
      "strip_size_kb": 64
    },
    "cntlr_list": [
      {
        "cntlr_id": "0ee93ac9fee54eb99e0ae0095e2c523c",
        "sock_addr": "localhost:9820",
        "is_primary": true,
        "err_info": {
          "timestamp": "2021-06-22 05:45:52.255526703 +0000 UTC"
        }
      },
      {
        "cntlr_id": "4d296c6044994f0aaee7ef9ea14571d9",
        "sock_addr": "localhost:9821",
        "cntlr_idx": 1,
        "err_info": {
          "timestamp": "2021-06-22 05:45:52.443623618 +0000 UTC"
        }
      }
    ],
    "grp_list": [
      {
        "grp_id": "45d0135352ed4620a760f874ca8f1560",
        "size": 134217728,
        "err_info": {
          "timestamp": "2021-06-22 05:45:51.391511017 +0000 UTC"
        },
        "vd_list": [
          {
            "vd_id": "821db145028c41a5b7bdd5257be3e1f1",
            "sock_addr": "localhost:9720",
            "pd_name": "pd0",
            "size": 67108864,
            "qos": {},
            "be_err_info": {
              "timestamp": "2021-06-22 05:45:47.47142903 +0000 UTC"
            },
            "fe_err_info": {
              "timestamp": "2021-06-22 05:45:51.231529123 +0000 UTC"
            }
          },
          {
            "vd_id": "5a786119a887413ea39716b0baf419cd",
            "vd_idx": 1,
            "sock_addr": "localhost:9721",
            "pd_name": "pd1",
            "size": 67108864,
            "qos": {},
            "be_err_info": {
              "timestamp": "2021-06-22 05:45:47.947491643 +0000 UTC"
            },
            "fe_err_info": {
              "timestamp": "2021-06-22 05:45:49.663537187 +0000 UTC"
            }
          }
        ]
      }
    ]
  }
}
There are two cntlrs in the cntlr_list. We
can find "is_primary": true from the first cntlr, so it is the
primary. There are also two VDs in the vd_list,
one is allocated from localhost:9720/pd0, another is allocated
from localhost:9721/pd1.
Create exp0a
Run below command to create an EXP:
./vda_cli exp create --da-name da0 --exp-name exp0a \
--initiator-nqn nqn.2016-06.io.spdk:host0
Get exp0a status
Run below command to get the EXP status:
./vda_cli exp get --da-name da0 --exp-name exp0a
Below is an exmaple response:
{
  "reply_info": {
    "req_id": "0b05cada-25f7-4cf5-aac1-cbc1d4f77779",
    "reply_msg": "succeed"
  },
  "exporter": {
    "exp_id": "e01d5adb4f694591afdce2838b9112d9",
    "exp_name": "exp0a",
    "initiator_nqn": "nqn.2016-06.io.spdk:host0",
    "target_nqn": "nqn.2016-06.io.vda:exp-da0-exp0a",
    "serial_number": "c5e94c313982b7e362dd",
    "model_number": "VDA_CONTROLLER",
    "exp_info_list": [
      {
        "nvmf_listener": {
          "tr_type": "tcp",
          "adr_fam": "ipv4",
          "tr_addr": "127.0.0.1",
          "tr_svc_id": "4430"
        },
        "err_info": {
          "timestamp": "2021-06-22 05:50:16.047444703 +0000 UTC"
        }
      },
      {
        "cntlr_idx": 1,
        "nvmf_listener": {
          "tr_type": "tcp",
          "adr_fam": "ipv4",
          "tr_addr": "127.0.0.1",
          "tr_svc_id": "4431"
        },
        "err_info": {
          "timestamp": "2021-06-22 05:50:18.039508566 +0000 UTC"
        }
      }
    ]
  }
}
We can see two items in the exp_info_list, they are the two
EXPs on the two cntlrs. The
host can connect to both of them.
Connect to the DA/EXP
Install the nvme-tcp kernel module:
sudo modprobe nvme-tcp
Install the nvme-cli. E.g. you may run below command in a ubuntu system:
sudo apt install -y nvme-cli
Now we can connect to the two cntlrs:
sudo nvme connect -t tcp -n nqn.2016-06.io.vda:exp-da0-exp0a -a 127.0.0.1 -s 4430 --hostnqn nqn.2016-06.io.spdk:host0
sudo nvme connect -t tcp -n nqn.2016-06.io.vda:exp-da0-exp0a -a 127.0.0.1 -s 4431 --hostnqn nqn.2016-06.io.spdk:host0
If the kernel nvme multiple path is enabled, the two cntlrs will be aggregated to a single device autoamtically. You man run below command to check whether nvme multiple is enabled:
grep CONFIG_NVME_MULTIPATH /boot/config-$(uname -r)
You may use it as a normal disk on the host, e.g.:
sudo parted /dev/disk/by-id/nvme-VDA_CONTROLLER_c5e94c313982b7e362dd print
Check the cluster status
List all the CNs:
./vda_cli cn list
Result:
{
  "reply_info": {
    "req_id": "68a165e6-5314-43f8-9561-c1ba506a79dc",
    "reply_msg": "succeed"
  },
  "token": "L3ZkYS9saXN0L2NuLzAwMDBhMmQ4QGxvY2FsaG9zdDo5ODIw",
  "cn_summary_list": [
    {
      "sock_addr": "localhost:9821"
    },
    {
      "sock_addr": "localhost:9820"
    }
  ]
}
You can find all the sock_addr in the cn_summary_list. If
there are too many CNs, the result will be pagination. You can use
vda_cli cn list --token xxxx to get the next page. The token
xxxx can be found from the previous result.
After we know the sock_addr of a CN, we can check its status:
./vda_cli cn get --sock-addr localhost:9820
Result:
{
  "reply_info": {
    "req_id": "85f4bac4-3041-438f-aefa-3940ed84c28d",
    "reply_msg": "succeed"
  },
  "controller_node": {
    "cn_id": "058a4172396c441885dd3286c122ff4e",
    "sock_addr": "localhost:9820",
    "nvmf_listener": {
      "tr_type": "tcp",
      "adr_fam": "ipv4",
      "tr_addr": "127.0.0.1",
      "tr_svc_id": "4430"
    },
    "hash_code": 41688,
    "err_info": {
      "timestamp": "2021-06-22 05:50:16.207509206 +0000 UTC"
    },
    "cntlr_fe_list": [
      {
        "cntlr_id": "0ee93ac9fee54eb99e0ae0095e2c523c",
        "da_name": "da0",
        "is_primary": true,
        "err_info": {
          "timestamp": "2021-06-22 05:50:16.047447453 +0000 UTC"
        },
        "grp_fe_list": [
          {
            "grp_id": "45d0135352ed4620a760f874ca8f1560",
            "size": 134217728,
            "err_info": {
              "timestamp": "2021-06-22 05:50:15.539520506 +0000 UTC"
            },
            "vd_fe_list": [
              {
                "vd_id": "821db145028c41a5b7bdd5257be3e1f1",
                "size": 67108864,
                "err_info": {
                  "timestamp": "2021-06-22 05:50:15.475493961 +0000 UTC"
                }
              },
              {
                "vd_id": "5a786119a887413ea39716b0baf419cd",
                "vd_idx": 1,
                "size": 67108864,
                "err_info": {
                  "timestamp": "2021-06-22 05:50:15.443433468 +0000 UTC"
                }
              }
            ]
          }
        ],
        "snap_fe_list": [
          {
            "snap_id": "68a303d4411a442dbd07d5bc4912f0a9",
            "err_info": {
              "timestamp": "2021-06-22 05:50:15.667518335 +0000 UTC"
            }
          }
        ],
        "exp_fe_list": [
          {
            "exp_id": "e01d5adb4f694591afdce2838b9112d9",
            "err_info": {
              "timestamp": "2021-06-22 05:50:16.047444703 +0000 UTC"
            }
          }
        ]
      }
    ]
  }
}
The controller_node field has the basic information of this
The cntlr_fe_list field has all the cntlrs of
this CN.
List all the DNs:
./vda_cli dn list
Result:
{
  "reply_info": {
    "req_id": "912b7d2c-31ec-42f1-aece-88f1e89c7254",
    "reply_msg": "succeed"
  },
  "token": "L3ZkYS9saXN0L2RuLzAwMDBjZjg3QGxvY2FsaG9zdDo5NzIw",
  "dn_summary_list": [
    {
      "sock_addr": "localhost:9721"
    },
    {
      "sock_addr": "localhost:9720"
    }
  ]
}
Similar as CN, after we have the DN sock_addr list, we can check each individual DN:
./vda_cli dn get --sock-addr localhost:9720
Result:
{
  "reply_info": {
    "req_id": "d2e19fa3-394c-4add-bba1-b124ad769726",
    "reply_msg": "succeed"
  },
  "disk_node": {
    "dn_id": "07ff85310a864b449ce9b53231e8389f",
    "sock_addr": "localhost:9720",
    "version": 3,
    "nvmf_listener": {
      "tr_type": "tcp",
      "adr_fam": "ipv4",
      "tr_addr": "127.0.0.1",
      "tr_svc_id": "4420"
    },
    "hash_code": 53127,
    "err_info": {
      "timestamp": "2021-06-22 05:45:47.567450797 +0000 UTC"
    }
  }
}
The result shows the basic information of this DN, but it doesn’t have any PD information. We can list all PDs on a given DN:
./vda_cli pd list --sock-addr localhost:9720
Result:
{
  "reply_info": {
    "req_id": "59d5ac98-1b65-4849-b211-060f563eecff",
    "reply_msg": "succeed"
  },
  "pd_summary_list": [
    {
      "pd_name": "pd0"
    }
  ]
}
Then we can get the details of a given PD:
./vda_cli pd get --sock-addr localhost:9720 --pd-name pd0
Result:
{
  "reply_info": {
    "req_id": "cfee6d23-c042-480f-b63c-9671b0c1cd36",
    "reply_msg": "succeed"
  },
  "physical_disk": {
    "pd_id": "e86bb5e03b2446e48ac9465aacf602eb",
    "pd_name": "pd0",
    "total_size": 264241152,
    "free_size": 197132288,
    "total_qos": {},
    "free_qos": {},
    "BdevType": {
      "BdevMalloc": {
        "size": 268435456
      }
    },
    "err_info": {
      "timestamp": "2021-06-22 05:45:47.503458789 +0000 UTC"
    },
    "vd_be_list": [
      {
        "vd_id": "821db145028c41a5b7bdd5257be3e1f1",
        "da_name": "da0",
        "size": 67108864,
        "qos": {},
        "cntlr_id": "0ee93ac9fee54eb99e0ae0095e2c523c",
        "err_info": {
          "timestamp": "2021-06-22 05:45:47.47142903 +0000 UTC"
        }
      }
    ]
  }
}
The vd_be_list field lists all the VDs allocated
from this PD.
Clean up all resources
Disconnect from the host:
sudo nvme disconnect -n nqn.2016-06.io.vda:exp-da0-exp0a
You should get below output:
NQN:nqn.2016-06.io.vda:exp-da0-exp0a disconnected 2 controller(s)
It indicates both of the two controllers are disconnected.
Delete the exp0a:
./vda_cli exp delete --da-name da0 --exp-name exp0a
Delete the da0:
./vda_cli da delete --da-name da0
Delete the cn0:
./vda_cli cn delete --sock-addr localhost:9820
Delete the cn1:
./vda_cli cn delete --sock-addr localhost:9821
Delete the pd0:
./vda_cli pd delete --sock-addr localhost:9720 --pd-name pd0
Delete the dn0:
./vda_cli dn delete --sock-addr localhost:9720
Delete the pd1:
./vda_cli pd delete --sock-addr localhost:9721 --pd-name pd1
Delete the dn1:
./vda_cli dn delete --sock-addr localhost:9721
Terminate all the processes:
killall vda_portal
killall vda_monitor
killall vda_dn_agent
killall vda_cn_agent
killall etcd
./spdk/scripts/rpc.py -s /tmp/vda_data/dn0.sock spdk_kill_instance SIGTERM
./spdk/scripts/rpc.py -s /tmp/vda_data/dn1.sock spdk_kill_instance SIGTERM
./spdk/scripts/rpc.py -s /tmp/vda_data/cn0.sock spdk_kill_instance SIGTERM
./spdk/scripts/rpc.py -s /tmp/vda_data/cn1.sock spdk_kill_instance SIGTERM
Delete the work directory:
rm -rf /tmp/vda_data