Multiple Servers Deployment
A production environment may have lots of DNs and CNs, and may have multiple portals and monitors for high availability and scalability. In this tutorial, we will deploy two instances for each component. Below is the architecture:
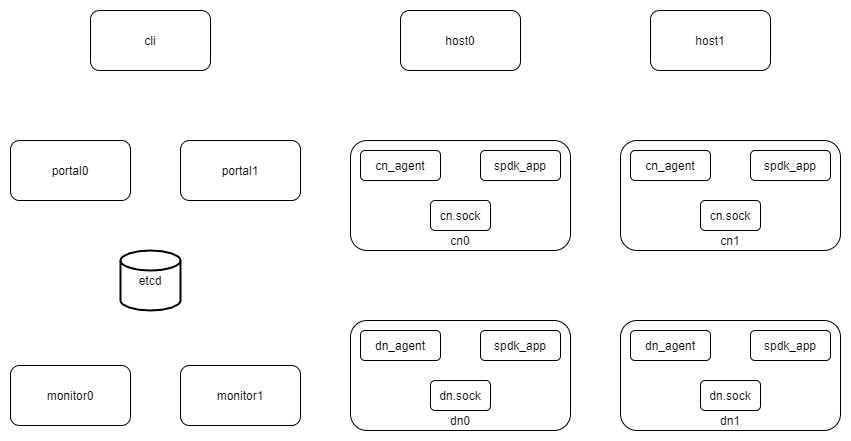
Below are the ip address of each components:
192.168.1.10 dn0
192.168.1.11 dn1
192.168.1.12 cn0
192.168.1.13 cn1
192.168.1.14 host0
192.168.1.15 host1
192.168.1.16 etcd
192.168.1.17 portal0
192.168.1.18 portal1
192.168.1.19 monitor0
192.168.1.20 monitor1
192.168.1.21 cli
Here we only deploy a single etcd server. We could deploy multiple etcd servers, please refer the etcd cluster guide. But the etcd cluster is out of the scope of this guide. So here we only deploy a single etcd for demo.
Note
In this guide, all the servers are ubuntu20.04 systems. But you could depploy them to any linux x86_86 system.
Launch etcd
Login to the etcd server (192.168.1.16).
Create work directory:
mkdir -p /tmp/vda_data
Follow the official install guide to install etcd:
curl -L -O https://github.com/etcd-io/etcd/releases/download/v3.5.0/etcd-v3.5.0-linux-amd64.tar.gz
tar xvf etcd-v3.5.0-linux-amd64.tar.gz
Go to the etcd directory and launch it:
cd etcd-v3.5.0-linux-amd64
./etcd --listen-client-urls http://192.168.1.16:2389 \
--advertise-client-urls http://192.168.1.16:2389 \
--listen-peer-urls http://192.168.1.16:2390 \
--name etcd0 --data-dir /tmp/vda_data/etcd0.data \
> /tmp/vda_data/etcd0.log 2>&1 &
Launch dn0
Login to the dn0 server (192.168.1.10).
Create work directory:
mkdir -p /tmp/vda_data
Install vda Go to the vda latest release. Download and unzip the package. In this doc, the latest version is v0.2.1:
curl -L -O https://github.com/virtual-disk-array/vda/releases/download/v0.2.1/vda_linux_amd64_v0.2.1.tar.gz
tar xvf vda_linux_amd64_v0.2.1.tar.gz
Go to the vda_linux_amd64_v0.2.1 directory:
cd vda_linux_amd64_v0.2.1
Initialize the spdk environment (run it once after every reboot):
sudo ./spdk/scripts/setup.sh
Launch the dataplane application:
sudo ./vda_dataplane --config ./dataplane_config.json \
--rpc-socket /tmp/vda_data/dn.sock > /tmp/vda_data/dn.log 2>&1 &
Change the owner of dn.sock, so the controlplane agent could communicate with it:
sudo chown $(id -u):$(id -g) /tmp/vda_data/dn.sock
Launch vda_dn_agent:
./vda_dn_agent --network tcp --address '192.168.1.10:9720' \
--sock-path /tmp/vda_data/dn.sock --sock-timeout 10 \
--lis-conf '{"trtype":"tcp","traddr":"192.168.1.10","adrfam":"ipv4","trsvcid":"4420"}' \
--tr-conf '{"trtype":"TCP"}' \
> /tmp/vda_data/dn_agent.log 2>&1 &
Get the nvme device pci address:
lspci | grep Non-Volatile
The nvme controller pci address is
00:1f.0in the environment of this guide, you may find different pci address in your envirnoment. Let’s remember this address, we will pass it to thevda_cli pd createcommand.
Launch dn1
Login to the dn1 server (192.168.1.11).
Create work directory:
mkdir -p /tmp/vda_data
Install vda Go to the vda latest release. Download and unzip the package. In this doc, the latest version is v0.2.1:
curl -L -O https://github.com/virtual-disk-array/vda/releases/download/v0.2.1/vda_linux_amd64_v0.2.1.tar.gz
tar xvf vda_linux_amd64_v0.2.1.tar.gz
Go to the vda_linux_amd64_v0.2.1 directory:
cd vda_linux_amd64_v0.2.1
Initialize the spdk environment (run it once after every reboot):
sudo ./spdk/scripts/setup.sh
Launch the dataplane application:
sudo ./vda_dataplane --config ./dataplane_config.json \
--rpc-socket /tmp/vda_data/dn.sock > /tmp/vda_data/dn.log 2>&1 &
Change the owner of dn.sock, so the controlplane agent could communicate with it:
sudo chown $(id -u):$(id -g) /tmp/vda_data/dn.sock
Launch vda_dn_agent:
./vda_dn_agent --network tcp --address '192.168.1.10:9720' \
--sock-path /tmp/vda_data/dn.sock --sock-timeout 10 \
--lis-conf '{"trtype":"tcp","traddr":"192.168.1.10","adrfam":"ipv4","trsvcid":"4420"}' \
--tr-conf '{"trtype":"TCP"}' \
> /tmp/vda_data/dn_agent.log 2>&1 &
Get the nvme device pci address:
lspci | grep Non-Volatile
The nvme controller pci address is
00:1f.0in the environment of this guide, you may find different pci address in your envirnoment. Let’s remember this address, we will pass it to thevda_cli pd createcommand.
Launch cn0
Login to the cn0 server (192.168.1.12).
Create work directory:
mkdir -p /tmp/vda_data
Install vda Go to the vda latest release. Download and unzip the package. In this doc, the latest version is v0.2.1:
curl -L -O https://github.com/virtual-disk-array/vda/releases/download/v0.2.1/vda_linux_amd64_v0.2.1.tar.gz
tar xvf vda_linux_amd64_v0.2.1.tar.gz
Go to the vda_linux_amd64_v0.2.1 directory:
cd vda_linux_amd64_v0.2.1
Initialize the spdk environment (run it once after every reboot):
sudo ./spdk/scripts/setup.sh
Launch the dataplane application:
sudo ./vda_dataplane --config ./dataplane_config.json \
--rpc-socket /tmp/vda_data/cn.sock > /tmp/vda_data/cn.log 2>&1 &
Change the owner of cn.sock, so the controlplane agent could communicate with it:
sudo chown $(id -u):$(id -g) /tmp/vda_data/cn.sock
Launch vda_cn_agent:
./vda_cn_agent --network tcp --address '192.168.1.12:9820' \
--sock-path /tmp/vda_data/cn.sock --sock-timeout 10 \
--lis-conf '{"trtype":"tcp","traddr":"192.168.1.12","adrfam":"ipv4","trsvcid":"4430"}' \
--tr-conf '{"trtype":"TCP"}' \
> /tmp/vda_data/cn_agent.log 2>&1 &
Launch cn1
Login to the cn1 server (192.168.1.13).
Create work directory:
mkdir -p /tmp/vda_data
Install vda Go to the vda latest release. Download and unzip the package. In this doc, the latest version is v0.2.1:
curl -L -O https://github.com/virtual-disk-array/vda/releases/download/v0.2.1/vda_linux_amd64_v0.2.1.tar.gz
tar xvf vda_linux_amd64_v0.2.1.tar.gz
Go to the vda_linux_amd64_v0.2.1 directory:
cd vda_linux_amd64_v0.2.1
Initialize the spdk environment (run it once after every reboot):
sudo ./spdk/scripts/setup.sh
Launch the dataplane application:
sudo ./vda_dataplane --config ./dataplane_config.json \
--rpc-socket /tmp/vda_data/cn.sock > /tmp/vda_data/cn.log 2>&1 &
Change the cn.sock permission so the controlplane agent could communicate with it:
sudo chown $(id -u):$(id -g) /tmp/vda_data/cn.sock
Launch vda_cn_agent:
./vda_cn_agent --network tcp --address '192.168.1.13:9820' \
--sock-path /tmp/vda_data/cn.sock --sock-timeout 10 \
--lis-conf '{"trtype":"tcp","traddr":"192.168.1.13","adrfam":"ipv4","trsvcid":"4430"}' \
--tr-conf '{"trtype":"TCP"}' \
> /tmp/vda_data/cn_agent.log 2>&1 &
Launch portal0
Login to the portal0 server (192.168.1.17).
Create work directory:
mkdir -p /tmp/vda_data
Install vda Go to the vda latest release. Download and unzip the package. In this doc, the latest version is v0.2.1:
curl -L -O https://github.com/virtual-disk-array/vda/releases/download/v0.2.1/vda_linux_amd64_v0.2.1.tar.gz
tar xvf vda_linux_amd64_v0.2.1.tar.gz
Go to the vda_linux_amd64_v0.2.1 directory:
cd vda_linux_amd64_v0.2.1
Launch vda_portal:
./vda_portal --portal-address '192.168.1.17:9520' --portal-network tcp \
--etcd-endpoints 192.168.1.16:2389 \
> /tmp/vda_data/portal.log 2>&1 &
Launch portal1
Login to the portal1 server (192.168.1.18).
Create work directory:
mkdir -p /tmp/vda_data
Install vda Go to the vda latest release. Download and unzip the package. In this doc, the latest version is v0.2.1:
curl -L -O https://github.com/virtual-disk-array/vda/releases/download/v0.2.1/vda_linux_amd64_v0.2.1.tar.gz
tar xvf vda_linux_amd64_v0.2.1.tar.gz
Go to the vda_linux_amd64_v0.2.1 directory:
cd vda_linux_amd64_v0.2.1
Launch vda_portal:
./vda_portal --portal-address '192.168.1.18:9520' --portal-network tcp \
--etcd-endpoints 192.168.1.16:2389 \
> /tmp/vda_data/portal.log 2>&1 &
Launch monitor0
Login to the monitor0 server (192.168.1.19).
Create work directory:
mkdir -p /tmp/vda_data
Install vda Go to the vda latest release. Download and unzip the package. In this doc, the latest version is v0.2.1:
curl -L -O https://github.com/virtual-disk-array/vda/releases/download/v0.2.1/vda_linux_amd64_v0.2.1.tar.gz
tar xvf vda_linux_amd64_v0.2.1.tar.gz
Go to the vda_linux_amd64_v0.2.1 directory:
cd vda_linux_amd64_v0.2.1
Launch vda_monitor:
./vda_monitor --etcd-endpoints 192.168.1.16:2389 \
> /tmp/vda_data/monitor.log 2>&1 &
Launch monitor1
Login to the monitor0 server (192.168.1.20).
Create work directory:
mkdir -p /tmp/vda_data
Install vda Go to the vda latest release. Download and unzip the package. In this doc, the latest version is v0.2.1:
curl -L -O https://github.com/virtual-disk-array/vda/releases/download/v0.2.1/vda_linux_amd64_v0.2.1.tar.gz
tar xvf vda_linux_amd64_v0.2.1.tar.gz
Go to the vda_linux_amd64_v0.2.1 directory:
cd vda_linux_amd64_v0.2.1
Launch vda_monitor:
./vda_monitor --etcd-endpoints 192.168.1.16:2389 \
> /tmp/vda_data/monitor.log 2>&1 &
Operate against the VDA cluster
Login to the cli server (192.168.1.21)
Install vda Go to the vda latest release. Download and unzip the package. In this doc, the latest version is v0.2.1:
curl -L -O https://github.com/virtual-disk-array/vda/releases/download/v0.2.1/vda_linux_amd64_v0.2.1.tar.gz
tar xvf vda_linux_amd64_v0.2.1.tar.gz
Go to the vda_linux_amd64_v0.2.1 directory:
cd vda_linux_amd64_v0.2.1
Create dn0:
./vda_cli --portal-addr 192.168.1.17:9520 dn create --sock-addr 192.168.1.10:9720 \
--tr-type tcp --tr-addr 192.168.1.10 --adr-fam ipv4 --tr-svc-id 4420
Create the pd on dn0:
./vda_cli --portal-addr 192.168.1.17:9520 pd create --sock-addr 192.168.1.10:9720 --pd-name pd0 \
--bdev-type-key nvme --bdev-type-value 00:1f.0
Create dn1:
./vda_cli --portal-addr 192.168.1.17:9520 dn create --sock-addr 192.168.1.11:9720 \
--tr-type tcp --tr-addr 192.168.1.11 --adr-fam ipv4 --tr-svc-id 4420
Create the pd on dn1:
./vda_cli --portal-addr 192.168.1.17:9520 pd create --sock-addr 192.168.1.11:9720 --pd-name pd1 \
--bdev-type-key nvme --bdev-type-value 00:1f.0
Create cn0:
./vda_cli --portal-addr 192.168.1.17:9520 cn create --sock-addr 192.168.1.12:9820 \
--tr-type tcp --tr-addr 192.168.1.12 --adr-fam ipv4 --tr-svc-id 4430
Create cn1:
./vda_cli --portal-addr 192.168.1.17:9520 cn create --sock-addr 192.168.1.13:9820 \
--tr-type tcp --tr-addr 192.168.1.13 --adr-fam ipv4 --tr-svc-id 4430
Create dn0:
./vda_cli --portal-addr 192.168.1.17:9520 da create --da-name da0 --size-mb 512 --physical-size-mb 512 \
--cntlr-cnt 2 --strip-cnt 2 --strip-size-kb 64
Export dn0 to host0:
./vda_cli --portal-addr 192.168.1.17:9520 exp create --da-name da0 --exp-name exp0a \
--initiator-nqn nqn.2016-06.io.spdk:host0
Get the NVMeOF information of exp0a:
./vda_cli --portal-addr 192.168.1.17:9520 exp get --da-name da0 --exp-name exp0a
The
exp getoutput:{ "reply_info": { "req_id": "ed50fb8d-1b03-4558-b4c3-b2df97887a6a", "reply_msg": "succeed" }, "exporter": { "exp_id": "2e1e29cbc2a547e8a05fb40f052f4eca", "exp_name": "exp0a", "initiator_nqn": "nqn.2016-06.io.spdk:host0", "target_nqn": "nqn.2016-06.io.vda:exp-da0-exp0a", "serial_number": "c5e94c313982b7e362dd", "model_number": "VDA_CONTROLLER", "exp_info_list": [ { "nvmf_listener": { "tr_type": "tcp", "adr_fam": "ipv4", "tr_addr": "192.168.1.12", "tr_svc_id": "4430" }, "err_info": { "timestamp": "2021-07-05 18:13:16.010920244 +0000 UTC" } }, { "cntlr_idx": 1, "nvmf_listener": { "tr_type": "tcp", "adr_fam": "ipv4", "tr_addr": "192.168.1.13", "tr_svc_id": "4430" }, "err_info": { "timestamp": "2021-07-05 18:13:16.133520401 +0000 UTC" } } ] } }
Create dn1:
./vda_cli --portal-addr 192.168.1.17:9520 da create --da-name da1 --size-mb 1024 --physical-size-mb 1024 \
--cntlr-cnt 2 --strip-cnt 2 --strip-size-kb 64
Export da1 to host1:
./vda_cli --portal-addr 192.168.1.17:9520 exp create --da-name da1 --exp-name exp1a \
--initiator-nqn nqn.2016-06.io.spdk:host1
Get the NVMeOF information of exp1a:
./vda_cli --portal-addr 192.168.1.17:9520 exp get --da-name da1 --exp-name exp1a
The
exp getoutput:{ "reply_info": { "req_id": "09c402b9-2522-41e6-b3c3-c2a64cefd87a", "reply_msg": "succeed" }, "exporter": { "exp_id": "00c468db67444114bb65f632306dc024", "exp_name": "exp1a", "initiator_nqn": "nqn.2016-06.io.spdk:host1", "target_nqn": "nqn.2016-06.io.vda:exp-da1-exp1a", "serial_number": "8ddbe95dfec0e8d10e27", "model_number": "VDA_CONTROLLER", "exp_info_list": [ { "nvmf_listener": { "tr_type": "tcp", "adr_fam": "ipv4", "tr_addr": "192.168.1.12", "tr_svc_id": "4430" }, "err_info": { "timestamp": "2021-07-05 18:15:17.467799609 +0000 UTC" } }, { "cntlr_idx": 1, "nvmf_listener": { "tr_type": "tcp", "adr_fam": "ipv4", "tr_addr": "192.168.1.13", "tr_svc_id": "4430" }, "err_info": { "timestamp": "2021-07-05 18:15:17.630510608 +0000 UTC" } } ] } }
Connect to da0/exp0a from host0
Login to host0 (192.168.1.14)
Make sure nvme-tcp kernel module is inserted:
sudo modprobe nvme-tcp
Make sure nvme-cli is installed, e.g. on ubutun system:
sudo apt install -y nvme-cli
Connect to the two cntlrs of dn0/exp0a:
sudo nvme connect -t tcp -n nqn.2016-06.io.vda:exp-da0-exp0a -a 192.168.1.12 -s 4430 --hostnqn nqn.2016-06.io.spdk:host0
sudo nvme connect -t tcp -n nqn.2016-06.io.vda:exp-da0-exp0a -a 192.168.1.13 -s 4430 --hostnqn nqn.2016-06.io.spdk:host0
Create a filesystem on the da0 and create a file on it:
sudo mkfs.ext4 /dev/disk/by-id/nvme-VDA_CONTROLLER_c5e94c313982b7e362dd
sudo mount /dev/disk/by-id/nvme-VDA_CONTROLLER_c5e94c313982b7e362dd /mnt
sudo touch /mnt/foo
Umount the filesystem and disconnect the da0 from dn0/exp0a:
sudo umount /mnt
sudo nvme disconnect -n nqn.2016-06.io.vda:exp-da0-exp0a
Connect to da1/exp1a from host1
Login to host1 (192.168.1.15)
Make sure nvme-tcp kernel module is inserted:
sudo modprobe nvme-tcp
Make sure nvme-cli is installed, e.g. on ubutun system:
sudo apt install -y nvme-cli
Connect to the two cntlrs of dn0/exp0a:
sudo nvme connect -t tcp -n nqn.2016-06.io.vda:exp-da1-exp1a -a 192.168.1.12 -s 4430 --hostnqn nqn.2016-06.io.spdk:host1
sudo nvme connect -t tcp -n nqn.2016-06.io.vda:exp-da1-exp1a -a 192.168.1.13 -s 4430 --hostnqn nqn.2016-06.io.spdk:host1
access the dn0/exp0a:
sudo parted /dev/disk/by-id/nvme-VDA_CONTROLLER_8ddbe95dfec0e8d10e27 print
disconnect from dn0/exp0a:
sudo nvme disconnect -n nqn.2016-06.io.vda:exp-da1-exp1a
Export dn0 to host1
Login to the cli server (192.168.1.21)
Delete the dn0/exp0a:
./vda_cli --portal-addr 192.168.1.17:9520 exp delete --da-name da0 --exp-name exp0a
Export dn0 to host1:
./vda_cli --portal-addr 192.168.1.17:9520 exp create --da-name da0 --exp-name exp0b \
--initiator-nqn nqn.2016-06.io.spdk:host1
Get the dn0/exp0b NVMeOF information:
./vda_cli --portal-addr 192.168.1.17:9520 exp get --da-name da0 --exp-name exp0b
The
exp getoutput:{ "reply_info": { "req_id": "031979fe-9a79-43e8-b714-1acba85b27e5", "reply_msg": "succeed" }, "exporter": { "exp_id": "b45ddd68f3f04599974838eea87edb5f", "exp_name": "exp0b", "initiator_nqn": "nqn.2016-06.io.spdk:host1", "target_nqn": "nqn.2016-06.io.vda:exp-da0-exp0b", "serial_number": "61fef4f77a43f78a7d24", "model_number": "VDA_CONTROLLER", "exp_info_list": [ { "nvmf_listener": { "tr_type": "tcp", "adr_fam": "ipv4", "tr_addr": "192.168.1.12", "tr_svc_id": "4430" }, "err_info": { "timestamp": "2021-07-05 18:40:14.273027335 +0000 UTC" } }, { "cntlr_idx": 1, "nvmf_listener": { "tr_type": "tcp", "adr_fam": "ipv4", "tr_addr": "192.168.1.13", "tr_svc_id": "4430" }, "err_info": { "timestamp": "2021-07-05 18:40:14.485744169 +0000 UTC" } } ] } }
Connect to da0/exp0b from host1
Login to host1 (192.168.1.15)
Connect to the two cntlrs of dn0/exp0b:
sudo nvme connect -t tcp -n nqn.2016-06.io.vda:exp-da0-exp0b -a 192.168.1.12 -s 4430 --hostnqn nqn.2016-06.io.spdk:host1
sudo nvme connect -t tcp -n nqn.2016-06.io.vda:exp-da0-exp0b -a 192.168.1.13 -s 4430 --hostnqn nqn.2016-06.io.spdk:host1
Mount da0 to the /mnt and make sure the file foo exists:
sudo mount /dev/disk/by-id/nvme-VDA_CONTROLLER_61fef4f77a43f78a7d24 /mnt
ls /mnt
Umount the filesystem and disconnect da0:
sudo umount /mnt
sudo nvme disconnect -n nqn.2016-06.io.vda:exp-da0-exp0b
Cleanup the environment
In the above comands, the cli connect to the portal0 (192.168.1.17). Here we connect to the portal1 (192.167.1.18). They are equivalent.
Login to the cli server (192.168.1.21)
Go to the vda_linux_amd64_v0.2.1 directory:
cd vda_linux_amd64_v0.2.1
run below commands:
./vda_cli --portal-addr 192.168.1.18:9520 exp delete --da-name da0 --exp-name exp0b
./vda_cli --portal-addr 192.168.1.18:9520 exp delete --da-name da1 --exp-name exp1a
./vda_cli --portal-addr 192.168.1.18:9520 da delete --da-name da0
./vda_cli --portal-addr 192.168.1.18:9520 da delete --da-name da1
./vda_cli --portal-addr 192.168.1.18:9520 cn delete --sock-addr 192.168.1.12:9820
./vda_cli --portal-addr 192.168.1.18:9520 cn delete --sock-addr 192.168.1.13:9820
./vda_cli --portal-addr 192.168.1.18:9520 pd delete --sock-addr 192.168.1.10:9720 --pd-name pd0
./vda_cli --portal-addr 192.168.1.18:9520 pd delete --sock-addr 192.168.1.11:9720 --pd-name pd1
./vda_cli --portal-addr 192.168.1.18:9520 dn delete --sock-addr 192.168.1.10:9720
./vda_cli --portal-addr 192.168.1.18:9520 dn delete --sock-addr 192.168.1.11:9720
Login to dn0 and dn0, run below commands:
killall vda_dn_agent
cd vda_linux_amd64_v0.2.1
./spdk/scripts/rpc.py -s /tmp/vda_data/dn.sock spdk_kill_instance SIGTERM
rm -rf /tmp/vda_data
Login to cn0 and cn1, run below commands:
killall vda_cn_agent
cd vda_linux_amd64_v0.2.1
./spdk/scripts/rpc.py -s /tmp/vda_data/cn.sock spdk_kill_instance SIGTERM
rm -rf /tmp/vda_data
Login to the portal0 and port1, run below commands:
killall vda_portal
rm -rf /tmp/vda_data
Login to the monitor0 and monitor1, run below commands:
killall vda_monitor
rm -rf /tmp/vda_data
Login to the etcd, run below commands:
killall etcd
rm -rf /tmp/vda_data