Work With Kubernetes
The VDA can be configured as the kubernetes persistent volume via CSI interface. This guide creates a minimal kubernetes cluster via minikube, and creates a minimal vda cluster, then let the kubernetes cluster claim persistent volume(s) from the vda cluster. Below are the components we will deploy:
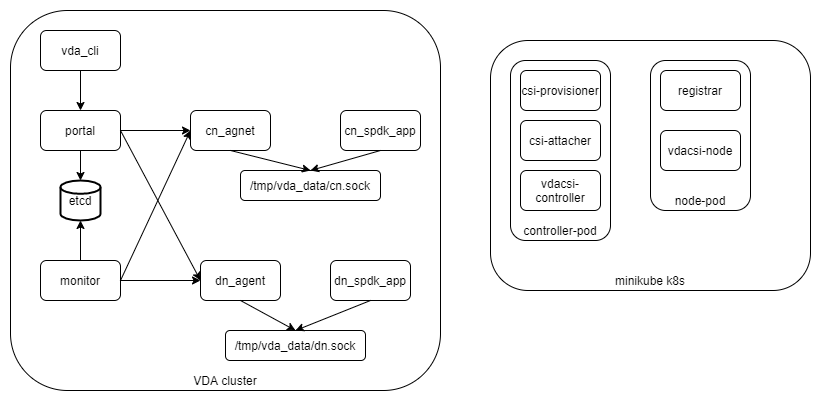
As a demo, We deploay both the kubernetes cluster and the vda compoents to the same server.
Install all dependencies
Install minikube
As a demo, we deploy a minimal kuberenetes cluster via minikube. According to the minikube installation guide You should run below commands on a linux server:
curl -LO https://storage.googleapis.com/minikube/releases/latest/minikube-linux-amd64
sudo install minikube-linux-amd64 /usr/local/bin/minikube
Prepare the dependencies of minikube none driver
The minikube support multiple drivers to launch kuberenetes. The vda csi plugin in kuberentes need to access the /dev and /sys of the host. Here we use the minikube none driver because the other minikube drivers require additional steps to transport the /dev and /sys to the vda csi plugin.
Please refer the official doc about the dependencies of none drivers. The installation steps are OS dependent. Below steps are tested on ubuntu22.04 and rocky linux 8, and they should work on other linux systems too.
Follow the docker installation guide to install docker engine. Please choose the
Platformaccording to your OS.Manage docker as a non-root user and configure Docker to start on boot according to the post installation guide.
Disable selinux. You may run the
getenforcecommand from command line. If the output isenforcing, you should disable selinux. If your system doesn’t have such a command, the selinux probably is not enabled, you may ignore this step. To disable selinux, please edit the/etc/selinux/configfile, changeSELINUX=enforcingtoSELINUX=permissive, then reboot the system.Install cri-tools. Open the cri-tools release page, download the released package according to your OS, then uncompress the package and run the install script, e.g.:
curl -L -O https://github.com/cri-o/cri-o/releases/download/v1.25.0/cri-o.amd64.v1.25.0.tar.gz
tar xvf cri-o.amd64.v1.25.0.tar.gz
cd cri-o
sudo ./install
The crictl will be install to
/usr/local/bin. The minikube will invoke it over thesudocommand. Please runsudo visudoand make sure the/usr/local/binis in thesecure_path. If no, please add it to thesecure_path, e.g.:Defaults secure_path = /sbin:/bin:/usr/sbin:/usr/bin:/usr/local/bin
Install cri-dockerd. Open the cri-dockerd release page, download the package according to your OS and install it. E.g.:
# rocky linux 8:
curl -L -O https://github.com/Mirantis/cri-dockerd/releases/download/v0.2.5/cri-dockerd-0.2.5-3.el8.x86_64.rpm
sudo rpm -i cri-dockerd-0.2.5-3.el8.x86_64.rpm
# ubuntu22.04:
curl -L -O https://github.com/Mirantis/cri-dockerd/releases/download/v0.2.5/cri-dockerd_0.2.5.3-0.ubuntu-jammy_amd64.deb
sudo dpkg -i cri-dockerd_0.2.5.3-0.ubuntu-jammy_amd64.deb
Install conntrack. The package name might be different in different OS:
sudo dnf install -y conntrack-tools # rocky linux 8
sudo apt-get install -y conntrack # ubuntu22.04
Prepare the vda csi plugin dependencies
On each kubernetes node we should install the nvme-cli and load nvme-tcp kernel module:
sudo dnf install -y nvme-cli # rocky linux 8
sudo apt install -y nvme-cli # ubuntu22.04
Download etcd
Run below commands:
curl -L -O https://github.com/etcd-io/etcd/releases/download/v3.5.0/etcd-v3.5.0-linux-amd64.tar.gz
tar xvf etcd-v3.5.0-linux-amd64.tar.gz
Download vda
Run below commands:
curl -L -O https://github.com/virtual-disk-array/vda/releases/download/v0.2.1/vda_linux_amd64_v0.2.1.tar.gz
tar xvf vda_linux_amd64_v0.2.1.tar.gz
Launch services
Reboot system
The VDA dataplane code need hugepage. If the system has too many memory fragments, the hugepage initialization may fail. To avoid memory fragments, please reboot the system before we launch any services:
sudo reboot
Load nvme-tcp
Make sure the nvme-tcp kernel module is loaded:
sudo modprobe nvme-tcp
Launch VDA
The steps are similar as the Minimal Deployment.
Create a work directory:
mkdir -p /tmp/vda_data
Launch etcd:
etcd-v3.5.0-linux-amd64/etcd --listen-client-urls http://localhost:2389 \
--advertise-client-urls http://localhost:2389 \
--listen-peer-urls http://localhost:2390 \
--name etcd0 --data-dir /tmp/vda_data/etcd0.data \
> /tmp/vda_data/etcd0.log 2>&1 &
Go to the vda directory:
cd vda_linux_amd64_v0.2.1
Prepare SPDK environment:
sudo ./spdk/scripts/setup.sh
Launch DN dataplane:
sudo ./vda_dataplane --config ./dataplane_config.json \
--rpc-socket /tmp/vda_data/dn.sock > /tmp/vda_data/dn.log 2>&1 &
Change the ower of dn.sock:
sudo chown $(id -u):$(id -g) /tmp/vda_data/dn.sock
Launch DN controplane:
./vda_dn_agent --network tcp --address '127.0.0.1:9720' \
--sock-path /tmp/vda_data/dn.sock --sock-timeout 10 \
--lis-conf '{"trtype":"tcp","traddr":"127.0.0.1","adrfam":"ipv4","trsvcid":"4420"}' \
--tr-conf '{"trtype":"TCP"}' \
> /tmp/vda_data/dn_agent.log 2>&1 &
Launch CN dataplane:
sudo ./vda_dataplane --config ./dataplane_config.json \
--rpc-socket /tmp/vda_data/cn.sock > /tmp/vda_data/cn.log 2>&1 &
Change the ower of cn.sock,:
sudo chown $(id -u):$(id -g) /tmp/vda_data/cn.sock
Launch CN controlplane:
./vda_cn_agent --network tcp --address '127.0.0.1:9820' \
--sock-path /tmp/vda_data/cn.sock --sock-timeout 10 \
--lis-conf '{"trtype":"tcp","traddr":"127.0.0.1","adrfam":"ipv4","trsvcid":"4430"}' \
--tr-conf '{"trtype":"TCP"}' \
> /tmp/vda_data/cn_agent.log 2>&1 &
Launch portal:
./vda_portal --portal-address '127.0.0.1:9520' --portal-network tcp \
--etcd-endpoints localhost:2389 \
> /tmp/vda_data/portal.log 2>&1 &
Launch monitor:
./vda_monitor --etcd-endpoints localhost:2389 \
> /tmp/vda_data/monitor.log 2>&1 &
Create DN:
./vda_cli dn create --sock-addr localhost:9720 \
--tr-type tcp --tr-addr 127.0.0.1 --adr-fam ipv4 --tr-svc-id 4420
Create PD:
./vda_cli pd create --sock-addr localhost:9720 --pd-name pd0 \
--bdev-type-key malloc --bdev-type-value 256
Create CN:
./vda_cli cn create --sock-addr localhost:9820 \
--tr-type tcp --tr-addr 127.0.0.1 --adr-fam ipv4 --tr-svc-id 4430
That’s all. We won’t create DAs and EXPs manually here. The kubernetes will create them on demand.
Launch kubernetes cluster
Run below command:
minikube start --driver=none
Run below command to check all kubernentes components are available:
minikube kubectl -- get pods -A
The result should be:
NAMESPACE     NAME                                  READY   STATUS    RESTARTS   AGE
kube-system   coredns-6d4b75cb6d-s65dv              1/1     Running   0          5s
kube-system   etcd-ubuntu2204b                      1/1     Running   0          18s
kube-system   kube-apiserver-ubuntu2204b            1/1     Running   0          20s
kube-system   kube-controller-manager-ubuntu2204b   1/1     Running   0          20s
kube-system   kube-proxy-mvw4k                      1/1     Running   0          6s
kube-system   kube-scheduler-ubuntu2204b            1/1     Running   0          18s
kube-system   storage-provisioner                   1/1     Running   0          17s
You may wait several minutes or a longer time for all components are ready.
Create CSI sidecars
Make sure you are in the vda_linux_amd64_v0.2.1 directory, then
apply below resources to kubernetes:
minikube kubectl -- apply -f csi_sample/controller-rbac.yaml
minikube kubectl -- apply -f csi_sample/controller.yaml
minikube kubectl -- apply -f csi_sample/node-rbac.yaml
minikube kubectl -- apply -f csi_sample/node.yaml
minikube kubectl -- apply -f csi_sample/storageclass.yaml
Get the status of the controller and node:
minikube kubectl -- get pods
Make sure the READY of controller and node become 3/3 and 2/2:
NAME                  READY   STATUS    RESTARTS   AGE
vdacsi-controller-0   3/3     Running   0          17s
vdacsi-node-rng9x     2/2     Running   0          17s
Create testing pod
Make sure you are in the vda_linux_amd64_v0.2.1 directory, then
apply the PVC file
minikube kubectl -- apply -f csi_sample/testpvc.yaml
List all the DAs:
./vda_cli da list
We can find that a DA is created:
{
  "reply_info": {
    "req_id": "152fd621-5ad5-4d50-a6af-1b1ce6e35b6e",
    "reply_msg": "succeed"
  },
  "token": "L3ZkYS9saXN0L2RhL3B2Yy1mOWQ4Mzg5MC1iNGNhLTQwNTItOTk4Yy0zZTgxMjBjMjBlZjY=",
  "da_summary_list": [
    {
      "da_name": "pvc-f9d83890-b4ca-4052-998c-3e8120c20ef6",
      "description": "csi created volume"
    }
  ]
}
Apply the Pod file
minikube kubectl -- apply -f csi_sample/testpod.yaml
Wait for a while, run below command to get the status of the testpod:
minikube kubectl -- get pods vdacsi-test
You would get similar output as below:
NAME          READY   STATUS    RESTARTS   AGE
vdacsi-test   1/1     Running   0          55s
List the EXPs of the DA:
./vda_cli exp list --da-name pvc-f9d83890-b4ca-4052-998c-3e8120c20ef6
We can find there is an EXP in that DA:
{
  "reply_info": {
    "req_id": "4a8c60d5-3f26-4d09-8b43-26118e537683",
    "reply_msg": "succeed"
  },
  "exp_summary_list": [
    {
      "exp_name": "ubuntu2204b"
    }
  ]
}
Log in to the pod:
minikube kubectl -- exec --stdin --tty vdacsi-test -- /bin/sh
The DA is mounted to /vdavol, we run the ls command, we can find
it is an empty directory:
ls /vdavol
Create a file in the /vdavol directory:
touch /vdavol/foo
Exit the pod:
exit
Now we delete the pod:
minikube kubectl -- delete pod vdacsi-test
Then create the pod again:
minikube kubectl -- apply -f csi_sample/testpod.yaml
Run below command to check the pod status and wail until the pod is ready:
minikube kubectl -- get pods vdacsi-test
Log in to the pod again:
minikube kubectl -- exec --stdin --tty vdacsi-test -- /bin/sh
We can find the file /vdavol/foo exists:
ls /vdavol/foo
Exit the pod:
exit
Cleanup
Cleanup the kubernetes cluster
Delete test pod and test PVC:
minikube kubectl -- delete pod vdacsi-test
minikube kubectl -- delete pvc vdacsi-pvc
Delete the kubernentes cluster:
minikube stop
minikube delete
Cleanup the VDA cluster
Kill all the processes:
killall vda_portal
killall vda_monitor
killall vda_dn_agent
killall vda_cn_agent
killall etcd
./spdk/scripts/rpc.py -s /tmp/vda_data/dn.sock spdk_kill_instance SIGTERM
./spdk/scripts/rpc.py -s /tmp/vda_data/cn.sock spdk_kill_instance SIGTERM
Delete the work directory:
rm -rf /tmp/vda_data